- GNS3 is a software suite that simulates complex networks, providing an intuitive graphical user interface to design and configure virtual networks.
- Virtualbox is a virtualization software package for x86 and AMD64/Intel64-based computers from Oracle Corporation. It can be integrated into the GNS3 software suite.
- MiniNet is an OpenFlow testing platform consisting of a realistic virtual network, running real kernel, switch and application code, with a single command prompt.
Virtualbox / Mininet
Download Virtualbox HERE, and install (default settings are fine in most cases). Download Mininet HERE. After installing Virtualbox, and downloading Mininet.
Now create the Mininet VM in Virtualbox. To do this select NEW button from the toolbar and go through the wizard to install the Mininet VM. At step one select the name and operating system. Type is Linux and Version is Ubuntu. Click NEXT through the memory size configuration. At the Hard drive selection option, select 'Use an existing virtual hard drive file' and add the mininet vmdk file. Now click CREATE.
The Mininet VM is created. Now we need to add extra network adapters to Virtualbox. To do this open the File -> Preferences... menu item, and open the NETWORK tab. Within the NETWORK tab, select the 'Host-only Adapter' tab and click 'Add host-only network' icon, until there are at least three 'VirtualBox Host-Only Adapter's', then click OK.
Now we need to configure the Mininet VM with the newly created virtual ethernet adapters. To do this open the SETTINGS button, and open the NETWORK tab. Select the 'Host-only Adapter', choose the first 'Virtual Host-Only Ethernet Adapter'. And open the Advanced settings of the adapter, and uncheck the 'Cable Connected' option. Add Adapter 2 and Adapter 3 in the same way. And click OK.
Virtualbox is now configured.
GNS3
In GNS3 click Edit -> Preferences... and open the VirtualBox tab. Select the 'VirtualBox Guest' sub tab. Now select the 'Mininet' VM from the 'VM List' drop down list. Set the 'Number of NICs' to 3, and check the 'Reserve first NIC for VirtualBox NAT to host OS', the 'Enable Console Support', and the 'Enable Console Server' checkboxes. Add an 'Identifier name', I choose Mininet, click SAVE button and then click OK button.
Now we are ready the to build our first lab.
The lab
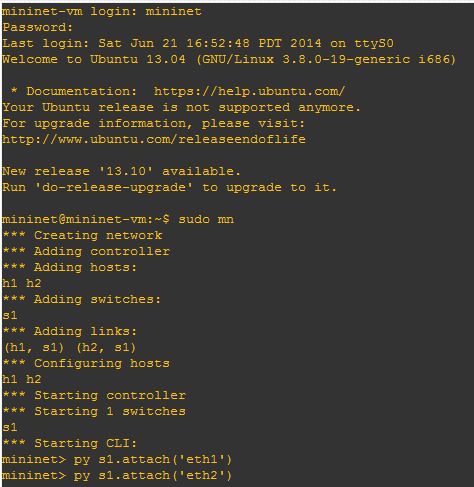
For demonstration purposes the lab will consist of two routers connected to the Mininet VM. The Mininet VM will be started in the standard configuration: one Openflow switch, one controller, and two virtual hosts.

After which I manually attached both the interfaces eth1 and eth2, to the switch s1.
Both routers are configured with in the IP range 10.0.0.0/24. The .1 and .2 are used by the two virtual hosts.
The result of a ping from R1 to R2, from the perspective of R2.
R2#
*Mar 1 00:07:24.155: IP ARP: rcvd req src 10.0.0.3 c00d.2440.0000, dst 10.0.0.4 FastEthernet0/0
*Mar 1 00:07:24.155: IP ARP: sent rep src 10.0.0.4 c00e.2440.0000,
dst 10.0.0.3 c00d.2440.0000 FastEthernet0/0
*Mar 1 00:07:24.159: IP ARP: rcvd rep src 10.0.0.3 c00d.2440.0000, dst 10.0.0.3 FastEthernet0/0
R2#
*Mar 1 00:07:42.775: ICMP: echo reply sent, src 10.0.0.4, dst 10.0.0.3
*Mar 1 00:07:42.823: ICMP: echo reply sent, src 10.0.0.4, dst 10.0.0.3
*Mar 1 00:07:42.847: ICMP: echo reply sent, src 10.0.0.4, dst 10.0.0.3
*Mar 1 00:07:42.867: ICMP: echo reply sent, src 10.0.0.4, dst 10.0.0.3
*Mar 1 00:07:42.887: ICMP: echo reply sent, src 10.0.0.4, dst 10.0.0.3


